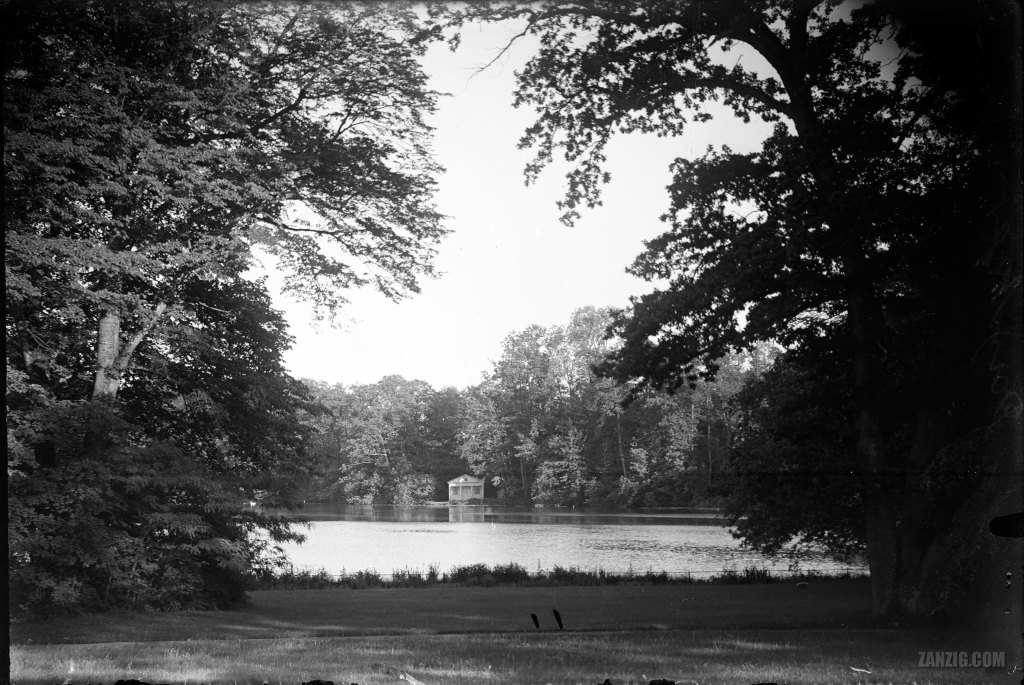
UNDATED – An unedited scan of a 10 x 14.6 cm glass negative shows a lake near Plön, Germany. Scan by Mark Zanzig/zanzig.com
Glass negatives
In a previous Scan Talk post I’ve written already about glass negatives and how to scan them, and I encouraged you to try it as well (if interested at all.) Yes, please go and get an affordable glass negative, discover the ultimate quality of antique photos, and preserve it for future generations.
BUT! Before you head to your preferred (online) antique store please understand that there are basically two types of glass negatives floating around, and this post may help you picking the right one. I did not know this when I started working with glass negatives, but I’ve learned my lessons and am happy to share my findings with you.
To get started please take a look at the typical mass production process of so-called “photo postcards”, from the original photo negative to the finished “genuine photo” postcard. This process was common for black-and-white postcards from about 1905 to the late 1960s. The alternative was rasterizing an image and using a print press to print the rasterized image on a postcard, but this is a different story.

In principle, the original photo (on a glass negative, a large film negative, or a 35 mm film negative) was printed as a large print. Possibly edits were made and text was applied. This edited variant was reproduced on a glass negative plate which (going forward) was the “master copy” for the respective postcard. To print a postcard, all you had to do was making a contact print of that master copy negative plate. Once finished, the negative plate went to the archive for future use. The back of the postcard got the standard layout for postcards and usually a “genuine photo postcard” label of sorts.
Sometimes, if the glass negative was very good, the publisher would skip steps 2 to 4, possibly apply a logo or a small caption directly on the glass negative, and then use the plate to produce the postcard right away. Of course, the omission of two reproduction steps increased the quality of the final postcard.
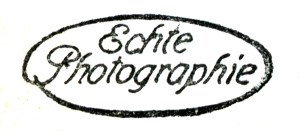
It’s easy to see why these postcards were marketed as “genuine photo postcards” (or “echte Photographie” in German): technically, they were genuine photo prints, created from a (glass) negative, with all the benefits, especially a higher range of shades and (usually) a superb sharpness.
Why is this important when you are looking to purchase a glass negative?
Well, it’s important because you now know the two glass negatives types involved in the process process:
- The “original” negative (created in step 1)
- The “master copy” (created in step 4)
While the master copy is technically a glass negative (and still of much higher quality than a rasterized image) it still is a derivative work, a copy, a reproduction. It is NOT the original image. Yet, these glass negative plates are sold as “glass negatives” as well. Again, I am not blaming the vendors, because the term is technically correct. It is a glass negative. But the quality usually does not reach the quality of the original glass negative from step 1.
That’s why you should be looking for original glass negatives, i.e. the glass plates that were used in the camera to capture the images at the time of shooting. These images are closest to what the photographer had in mind when shooting the image. They have highest quality and do not show any edits or “improvements” – they are “as is”, often damaged (at the edges), maybe not perfectly illuminated, and they may have aged over time. But this can be corrected as needed/wanted.
Here is a summary to help you distinguish original glass negative plates from derivative glass negative plates:
| Visual appearance | Original Glass Negative | Derivative Glass Negative | Rationale |
| Caption, logo, or design elements visible | no | very likely | Captions, logos or design elements were applied during editing (step 3) |
| Visible edits, e.g. edges of buildings or objects have been manually improved or altered | no | possibly | It was common practice to manually improve low contrast images during editing (step 3) |
| Edges of the negative show significant damages | possibly | rarely | Original glass negatives are older and more fragile and thus more prone to damages |
| Black border surrounding the image content shows shape of film mount | possibly | no | The black frame in the shape of a film mount was usually removed during editing so the resulting master (step 4) would not show it |
| Handwritten notes at the edge of the frame | possibly | no | Handwritten IDs usually were removed during editing so so the resulting master (step 4) would not show them |
| Multiple images on a single negative plate | no | possibly | Multi image postcards were composed from multiple bespoke photo prints (step 2) and not in-camera |
While I’d recommend working with original glass negative plates for utmost quality, working with derivatives has advantages as well. Usually some visible issues have been removed during editing, so the glass negative may look better than the original. What’s more, the captions were usually pretty accurate and can help you to find the exact location today if you want to write about it or do a side-by-side comparison.
In any event, it is fun to work with glass negatives, so go get one. Prices are between 5 and 20 Euro per glass negative. In rare cases you may find lots for less than 5 Euro per image, but these are typically original family photos (of people you don’t know) or derivatives of regions you’re not interested in. But they should be sufficient for getting a first impression and gathering experience.