
1950s – A combined negative and positive image shows the beach café on stilts in St. Peter Ording in Northern Germany. Photo © Cramers Kunstanstalt Dortmund (CeKaDe), Editing by Mark Zanzig/zanzig.com
A Hands-On Guide to Scanning High Resolution Images from Glass Negatives
This morning I shared my first scan of a glass negative image. It took me a while to find the settings for a scan quality that meets my expectations. As I think there may be some interest in the photo community, here is my hands-on guide on getting decent scans from such huge negatives. My scanner is an EPSON Perfection 4870 Photo. Yes, it’s an old scanner and there are newer scanners available but it works flawlessly for me. If you just want to try working with glass negatives, I suggest to purchase this scanner for little money on eBay.
You’ll need:
- A (large) glass negative
- EPSON Perfection 4870 Photo
- EPSON Scan software
- Adobe Photoshop
Once you have all this, you can get started.
By the way, I’m using version 3.0.4G of the EPSON Scan software, that’s the German version. I’ve tried my best to use the correct English terms, but – as always – YMMV. I think it’s intuitive enough to have a chance getting the settings right.
Step 1 – Preparation
Power on the scanner, clean the scanner glass, and remove all plastic trays (those for slides and negatives as well as the one for scans from documents and photos.)
Now start the EPSON scan software.
- Select ‘Professional Mode’
- Original – Document Type should be ‘Film’
- Original – Document Source should be ‘Negative Film’
- Original – Auto Exposure should be ‘Off’ or disabled
- Destination – Image Type should be ’16 bit grayscale’
- Destination – Resolution should be ‘4800 dpi’
- All settings below should be disabled, i.e. Document Size, Unsharp Mask, Descreening, Color Restoration, Backlight Correction, Dust Removal
- Important: Disable the ‘Thumbnail’ setting right below the ‘Preview’ button
Easy, eh?

Step 2 – The Preview Scan
Now put the glass negative cautiously on the scanning table, with the film side down and the glass side up, so you can see the image correctly when looking from above. The scan will appear to be flipped, though, but we’ll fix this in Photoshop later on.
If you have a landscape shot, you will want to tilt it by 90 degrees. That’s because the scanned area for slides and negatives is smaller than the area available for documents.
In fact, the scanned area is from about 3 to 17.5 cm horizontally (1.2 to 6.8 Inches) and from about 2 to 24.5 cm vertically (0.8 to 9.6 Inches). This limits the size of your original to about 14.5 x 22.5 cm (5.7 x 8.8 Inches). If your negative is larger than that, you won’t be able to scan it in one go with this scanner. (Depending on its size, you may even be unable to scan it at all due to the limitations of the frame that holds the scanning glass.)
Let’s assume that, like me, you have a 14.3 x 9.3 cm negative (5.6 x 3.6 Inches). This means, that you would have to position it very precisely to get a full scan. It’s much easier to tilt the negative by 90 degrees and position it approximately in the center of the scanning table. I suggest to have some kind of ruler as a positioning helper so you can position the negative absolutely parallel to the frame of the scanning glass. This means you won’t have to tilt the image by a couple of degrees later on in Photoshop which may reduce the image quality.
Now hit the ‘Preview’ button.
The software will show the preview. Position the dotted frame on the image in the preview window, and just within the image. Avoid any of the black areas. Just select actual image parts. Also avoid to include damaged areas or areas with text that has been added at a later stage. That’s because you want to only use intact parts of the image for the auto exposure feature of the software (which does an amazing job in this regard.)

Then hit the ‘Auto Exposure’ button. The selected parts of the image should instantly look much better because the full range from black to white is being used.
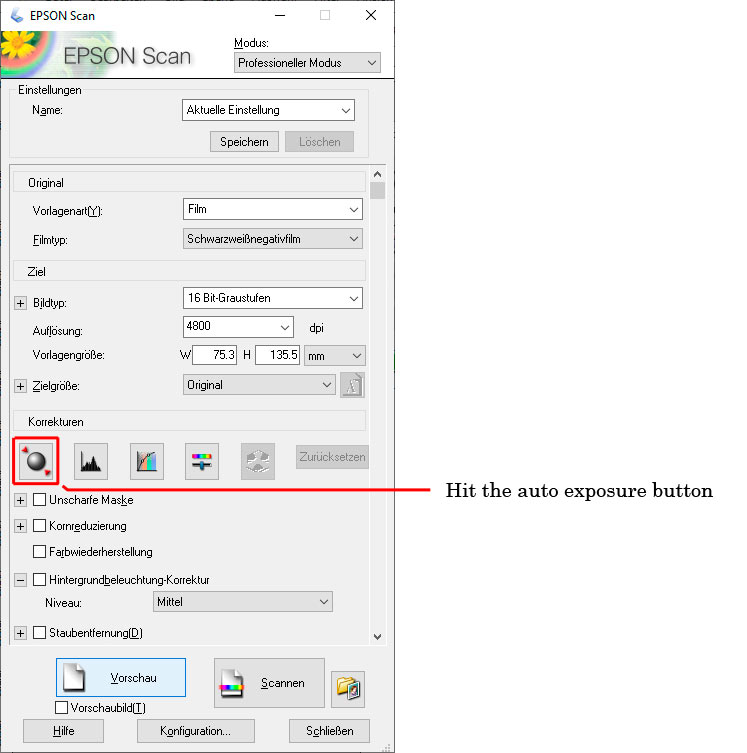

Now expand the dotted frame manually to include the entire image, i.e. slightly beyond the borders of your negative. Do not hit the ‘Auto Exposure’ button again (as this would include the parts we did not want to be considered for calculating the automatic exposure.)

Everything looks good? Then comes…
Step 3 – The Full Scan
Hit the ‘Scan’ button, confirm the file name, file format (I recommend TIFF which is lossless) and wait for a while until this huge scan is being captured. In my case, it took 17 minutes for the full scan.

This concludes the scanning bit. The next step is the (rough) editing.
Step 4 – Rough edit
I prefer to keep an unedited file that has already the correct orientation. So, all you need to do is open the file in Photoshop, tilt it by 90 degrees and then filp it horizontally.
Since you were cautious to align the image with the sides of the scanning table frame, you won’t have to tilt it any further in Photoshop, but of course you could do it if you want. Now save the rough edit as the original to your disk.
Step 5 – Edit
I recommend to do a ‘Save as…’ in order to create a working copy that enables you to try various editing routes without destroying the original scan. (Or use Adobe Lightroom or some other nifty software.) Do all your editing in the original color mode, in our case it’s 16 bit grayscale. This will preserve the colors until you are ready for….
Step 6 – Converting the image
Your final edit will still be in 16 bit grayscale mode TIFF. Save this image as your final edit. The file is not only huge (about 1 GB in my example) but sadly it can’t be used well by others. So, we’ll have to reduce the information, i.e. we’re about to lose some information and detail, and we don’t want to lose the final edit with all its details.
Try this:
- Set the Mode from grayscale to ‘RGB’
- Convert to “sRGB profile’ (if necessary)
- Set the Mode to ‘8 bits/channel’
- Save as JPEG
For my image (476 Megapixel) this still results in 222 MB when saved at ‘Quality 12’, but this is far smaller than the almost 3 GB it was (briefly) when we changed the mode to RGB.
And you’re done.

2 Comments